LEGO Crazy Animal Light Show🚦

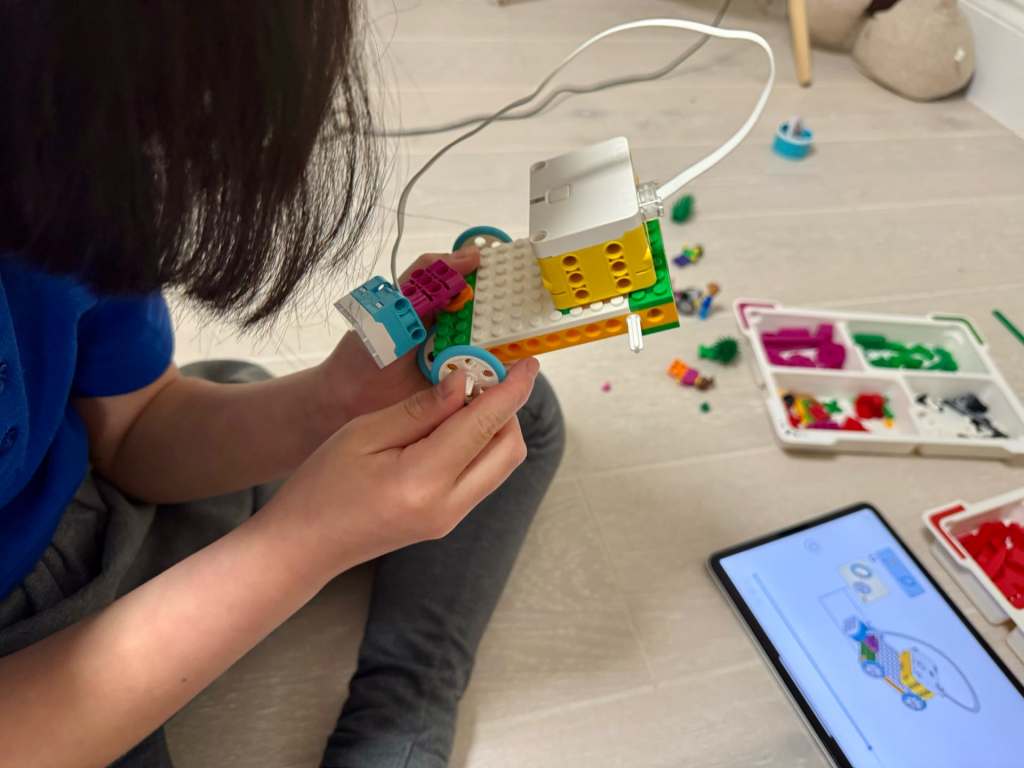
Hi everyone! I want to tell you about our new awesome LEGO SPIKE project that I built with Yue. We worked on something super fun—a camping animal alarm!

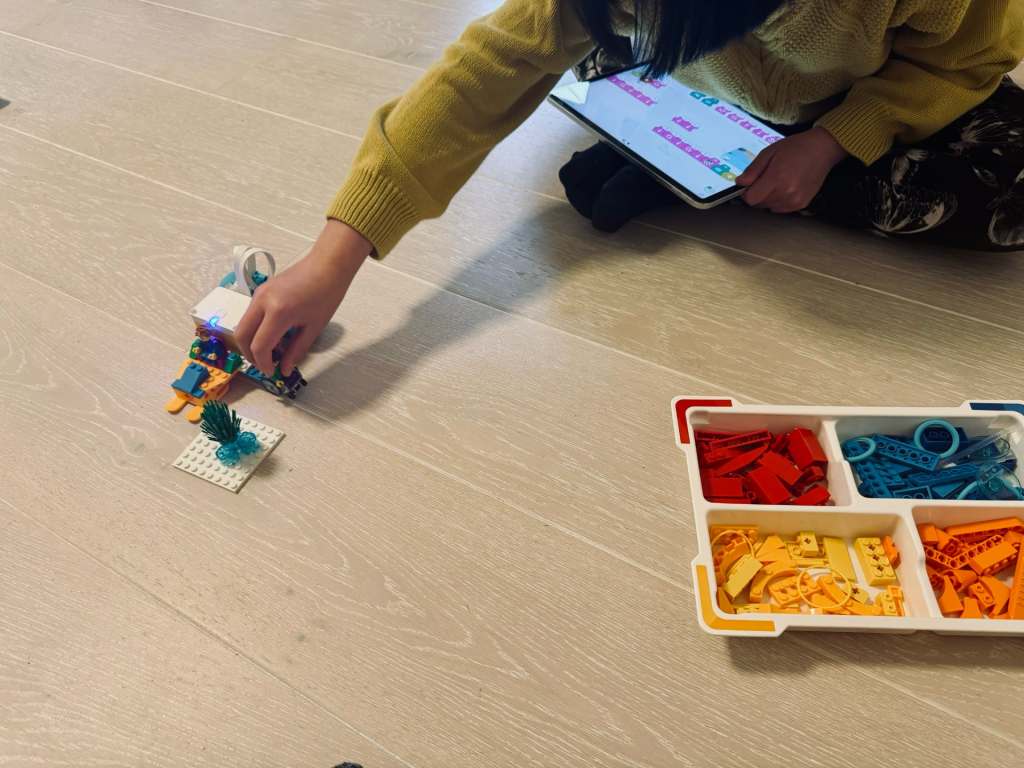
The idea behind this project is that a camper goes on a camping trip, and at night, he wants to see what animals are sneaking around his tent. To help him, we built a special animal alarm. It can light up and even make sounds to scare the animals away, which later ends up as a light show😜

We built this using LEGO Hub with two switches. One switch connected to a light, and the other connected to a camera. The camera could ā€œseeā€ animals, and when an animal with a certain colour passed by the camera, the light would shine. Later, I recorded some sounds to make the alarm even better.

The best part was creating multicoloured creatures and seeing how the alarm reacted. When I held up my colorful creature in front of the camera, it played all kinds of sounds. For example: ā€œThis is a green creature, … This is a red creature, … This is a yellow creature!ā€

Another thing I loved about this project was the counter. It showed how many creatures passed by using a bar chart. For each new creature, the chart added a color. It was so cool to see the project count and record all the colourful animals!

Lego Cave Car with Light Show ✨

Our third Lego project is a car that can explore caves! The story goes like this: a guy wanted to go into a dark cave, but he couldn’t see anything. So, he decided to build a car with a light on it to help him find his way in the dark.

Building the car was fun, but there was one small problem. We only had one LEGO Spike hub, which is the part that gives energy to the car. So, we could only use the hub to make the light work, but we had to push the car ourselves because the wheels couldn’t move.

But here’s where it gets super cool! I discovered something AMAZING about the lights. Did you know you can tap on the lights and change the colors? Each panel of the light can be a different colour! I showed my Yue, and he was so surprised because he didn’t even know about it. Ha, I taught him something (twice! šŸ˜„)

Okay, let me tell you about the BEST part! If you take the light, add a randomiser, and put them together in a loop, you can make it flash in all sorts of colours. It looks soooo good! It’s like a little light show! And that’s a reason I really like this project.

LEGO Arctic Car Polar Bear Search šŸ›·


In our second LEGO session, we took on the mission of helping a character get to the polar bears he loves so much! We built a car that he could drive across snowy places.

While coding, I discovered something really fun—loops! By adjusting a number, I could make our car do as many turns as I wanted. At one point, I made it spin 57 times!

Yue gave me a challenge to make the car drive in a square shape. Sounds simple, right? But when I tried, the car went a bit wild—it turned around, went backward, and did some crazy spins. It was funny, though!

As we didn’t have four wheels, it turned out to be a sledge/car! I love that I can make this sledge/car do all sorts of things—even if it’s not perfect every time. I 100% loved, and it was so funny!šŸ˜„šŸ˜‚

LEGO Boat Adventure šŸ›

Yesterday, our new LEGO Spike set finally arrived—yay! We couldn’t wait to try it, so my dad and I decided to build the first project: The Boat Trip. It’s all about these two little LEGO characters who are super excited to go on a boat ride! But there was a problem… what would push their boat into the pretend water?

One of the characters had an idea—let’s build a boat-pushing machine! So my dad and I got to work. First, we used the LEGO battery hub and connected it to a spinny thing (Yue: that’s called Motor). We added some special code blocks to make the spinny thing push the boat into the pretend water. It worked! The boat went right in—splash!

But we didn’t stop there! I thought, why not make it even more fun? The boat had holes in it, so we put the boat on a connector piece and used more code to make it spin like a theme park ride. The characters were spinning around!

Seeing the characters whirl around was so exciting! We did it together, and it felt like a real success. I can’t wait to try even more ideas with our LEGO Spike set.

A Fresh Start with LEGO SPIKE Education 🧱

It’s been a while since Char and I worked together on our apps and games. Both of us have been busier than usual—I’m wrapping up end-of-year projects at work, and she’s been busy with her 11-plus tuitions. As a result, we haven’t had as much time for our ‘YueChar.Games’ coding sessions, which I’ve missed.

While planning our return to app and game development, I took a closer look at what made it challenging last time around. We had a lot of fun brainstorming ideas and discussing designs, but there were two main obstacles we encountered.

First, the projects we attempted were often complex for my daughter. At her current skill level, it was difficult to manage all the details involved. While we enjoy learning, it became hard to keep up.

The second challenge was balancing coding and design. Char was deeply involved in the design aspects, but I handled most of the coding. I wanted her to develop computational thinking and problem-solving skills, but often the actual coding fell outside her comfort zone.

That’s when I decided to try the LEGO SPIKE Education set. Char has always loved building LEGO sets and has put considerable time and effort into creating her own beautiful designs. The SPIKE set could take her LEGO experience to a new level by introducing motors, sensors, and programmable hubs, plus a child-friendly, Scratch-like coding interface designed for young learners.

The examples in the SPIKE Essential set are fun, but admittedly a bit ‘toyish’. My plan is to start with these basics to get Char comfortable, and then gradually extend them into more practical, real-world projects with the Prime set. I hope this will offer her another fun way to problem-solving and coding activities.

Pumpkin Carving Fun 2024, Nezuko VS. Charizard šŸŽƒ

It’s been a busy week, and while we haven’t found time to work on our game and app projects lately, Char and I couldn’t miss the chance to dive into a Halloween tradition together: pumpkin carving!

This Halloween, we went out with four pumpkins—two big and two small. As usual, I picked one to carve a character that’s been memorable from my year in anime. Last year, I carved Luffy from One Piece, and this year, I took on Nezuko from Demon Slayer. It turned out pretty well, although I did accidentally smudge her nose in the final cleanup.

Char decided to continue her Pokemon theme. Last year, she carved Zubat, but this Halloween, she upped the challenge with Charizard! She found a pumpkin Charizard design online but we quickly realized it was a bit tricky to follow. To make it easier, she simplified and adapted it, also adding her own twist by turning Charizard’s flame tail into a star. It was amazing to see her custom design Charizard come to life as we carved it out together.

One of our smaller pumpkins was dedicated to an anime classic: the Faceless character from Spirited Away. I thought this would be a straightforward design because of its simple shape. However, when we transferred the design onto the pumpkin, the proportions didn’t translate perfectly; the face ended up looking more square than slim, giving Faceless a wired look. Although it wasn’t exactly what we intended, it still came out kind of spooky!

Last but not least, my wife joined in on the fun with her first-ever pumpkin carving. She went with a classic, spooky Halloween pumpkin face that turned out looking like a scream. It had just the right amount of shock and Halloween vibes, and I’d say she nailed it!

There’s something special about spending time together, trying out new ideas, and seeing them take shape—whether it’s an app, a game, or just some pumpkins.

Learning 2D Game Art Design for Super Cat Hop šŸŽØ

After nailing down the basic game logic for Super Cat Hop with SpriteKit, I hit an interesting challenge this week—turning Char’s “awesome” 😹 character drawings into fun, animated characters for the game! I quickly realized that, although I’m pretty good at coding, my drawing skills needed some serious work. So, I took some actions to dive into the world of 2D game art design.

The good news is that I didn’t need to become a master artist—just being able to create simple comic-style characters with bold edges and bright colors would do the trick. I started exploring some free tools and landed on two great options: Grease Pencil from Blender and Krita. While both were awesome, I went with Krita because it reminded me of the traditional drawing apps like Photoshop that I’m a bit more familiar with.

But before I switched to Krita, I gave Grease Pencil a try. I took my Char’s drawing, traced it, and added some colors. The Sculpting tool was cool—it let me move lines and points around to animate the character easily. The animations turned out pretty well, but something about it still felt a bit… off. It wasn’t the tool—it was me! I realized I needed to get better at drawing itself, not just using the tools.

So, I switched gears and started an online drawing course for Krita. After five hours of sketching, outlining, coloring, and shading, I was feeling a lot more confident. For my first practice piece, I drew my Char’s favorite comic, Bunny vs. Monkey. And honestly? It’s one of the best things I’ve ever drawn! Not bad for a beginner!

Once I had some drawing skills under my belt, I went back to Super Cat Hop. I redid the background and simplified my Char’s character, taking inspiration from Bunny vs. Monkey. Instead of detailed hands and legs, we went with a simple triangle body for the character, and it works! I added the game logic from last week, and now we’ve got a basic version of the game where the character hops around.

Next up, Char and I will work on refining the background to make it more original, adding sound, and giving the game a fun title. We’ve decided that instead of aiming for perfection, we’ll wrap this project up soon so we can move on to more fun ideas. With each game we build, we’re learning and getting better—and most importantly, we’re having fun together!

Quick Iterations with 60s Prototyping āœļø

This week, I stumbled across a great video on YouTube—it’s from an old WWDC17 session called 60 Seconds Prototyping“. I thought it would be fun to watch it with Char together, as we’re looking for new ideas to make our next app.

In the video, the presenter showed how you can use Keynote (MacOS version of the Powerpoint) to quickly create an app interface prototype in just one minute. The whole idea behind it was simple—don’t overthink it, just make something, show it to others, and learn from the feedback. I really like this idea, as this was such an easy concept for Char.

Usually, when we’re working on a new app or game idea, Char starts with a drawing on paper, then I jump into coding. But here’s the thing—it can take a while to get the prototype ready, and looking back, I think we could have saved some time by trying quick, simple prototypes at the start.

I hope watching this video helps Chan feel more confident. Sometimes she thinks, ā€œI can’t code, so I can’t make the app,ā€ but this video showed her that even with just paper and a pen, she can prototype! I’m hoping she takes that confidence and starts not only sketching her ideas but also sharing them with friends for feedback—maybe even changing things up before coming back to me for the coding phase.

As for our next project, I’m definitely going to encourage this idea of quick iterations. Instead of trying to perfect the design right from the start, we’ll aim to keep things simple, gather feedback, and improve as we go. šŸƒā€ā™€ļøā€āž”ļø

Status Bar Enhancement in Quick Times Tables v1.2 šŸ“‹

Shortcuts and Timer

This weekend, I had hoped to work on a new color scheme for Quick Times Tables, but I only had a bit of time to make some updates. So, I focused on two small but important enhancements for version 1.2.

The first update allows you to change the times table and number of questions directly from the quiz page’s status bar. This improvement came from a suggestion made by my wife. It’s such an obvious feature in hindsight, but somehow I didn’t think of it when building the first version. Perhaps my daughter and I should recruit her as our official project manager!

The second update is a new timer that shows the elapsed time in seconds during the quiz. Initially, I wasn’t sure if this feature was necessary, as I thought it might be distracting. But after thinking it over, I realized it could be very useful for children aiming to improve their speed. If you find it distracting, don’t worry—you can hide the timer in the settings if you prefer.

Hopefully, I’ll have more time next weekend to work on the color scheme. Maybe I’ll even add a fun ā€œmonsterā€ theme, as my daughter suggested!

Exploring SpriteKit: Our First Steps in Building the Super Cat Hop 😻

SpriteKit vs. Unity

This week, Char and I officially began working on our new game, Super Cat Hop. My main task has been learning how to use SpriteKit, a native game development framework for iOS. Last year, we tried using Unity to build a simple game together, but the process of deploying it to the App Store was a big hassle šŸ˜®ā€šŸ’Ø . As some of Unity’s libraries track user data, which make the privacy policy very complicated. Therefore this time, I decided to go with iOS’s native game framework to avoid these issues.

Hey O1, make me a game!

Since SpriteKit is new to me, I thought I’d test the waters by exploring AI’s ability to generate a basic game prototype. I provided a very detailed prompt with the game’s logic, scoring system, and mechanics to OpenAI’s O1 model, but unfortunately, the result didn’t work as expected. The generated game had issues with jumping mechanics and block movement (I guess the game logic might still be a bit challenging for LLMs at the moment). So I went back to learning SpriteKit from scratch.

First SpriteKit Fun

I started with the basics—drawing sprites and adding animations. The process felt pretty straightforward, and I was impressed with the physics system in SpriteKit, which allows you to create interactive elements quickly. I had a lot fun of play blocks with the physics system.

However, I think that for Super Cat Hop game, the physics system might be more complex than necessary. Instead, I’ll use traditional math-based rules to control the cat and blocks. Below is an example of my second attempt. I added a simple animation of a smiley face and implemented the core jumping logic. Each time the player taps the screen, the cat hops, and blocks appear on the screen.

The mechanics are coming together, but the hardest part will likely be the graphic design. I’m not very good at drawing, so my task for next week is to work on improving the visuals. Meanwhile, Char is focusing on designing the game’s characters and background. We’re aiming to have a prototype ready by next week, and I’m excited to see how it all comes together.