The theme we chose was “a ship sailing over the sea.” Each of us came up with our own storyline. My version is a ship bravely sails through the waves, but disaster strikes! A giant wave crashes into the ship, breaking it into pieces and washing it away.
Char’s version is Pikachu is at the helm, sailing confidently until the ship crashes near an island. Pikachu wakes up, finds himself ashore, and pulls the boat to safety on the island.
It was a great fun experience capture the stop-motion frames with our LEGO pieces. After reviewing the initial shots, I realised the background was too messy. To fix it, I added a filter to give the video a ‘The Great Wave’ look. I also experimented with sound effects, like adding the sound of waves, to make it more realistic. Which one do you like better: the dramatic shipwreck or Pikachu’s adventurous journey?
It’s been a while since Char and I worked together on our apps and games. Both of us have been busier than usual—I’m wrapping up end-of-year projects at work, and she’s been busy with her 11-plus tuitions. As a result, we haven’t had as much time for our ‘YueChar.Games’ coding sessions, which I’ve missed.
While planning our return to app and game development, I took a closer look at what made it challenging last time around. We had a lot of fun brainstorming ideas and discussing designs, but there were two main obstacles we encountered.
First, the projects we attempted were often complex for my daughter. At her current skill level, it was difficult to manage all the details involved. While we enjoy learning, it became hard to keep up.
The second challenge was balancing coding and design. Char was deeply involved in the design aspects, but I handled most of the coding. I wanted her to develop computational thinking and problem-solving skills, but often the actual coding fell outside her comfort zone.
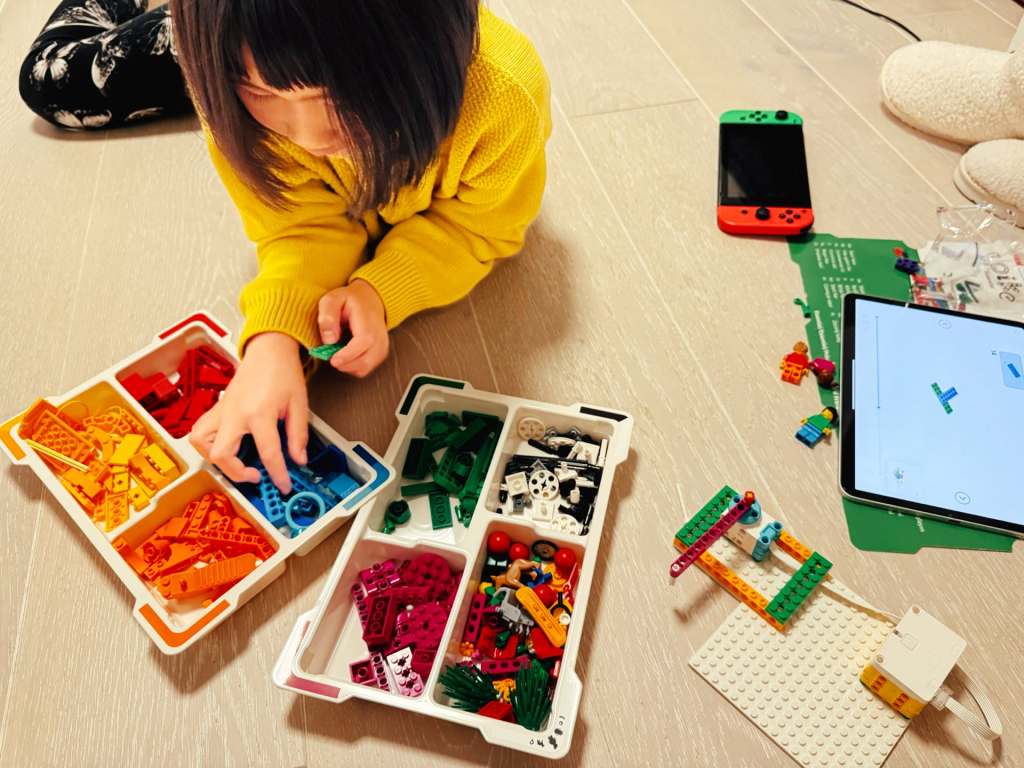
That’s when I decided to try the LEGO SPIKE Education set. Char has always loved building LEGO sets and has put considerable time and effort into creating her own beautiful designs. The SPIKE set could take her LEGO experience to a new level by introducing motors, sensors, and programmable hubs, plus a child-friendly, Scratch-like coding interface designed for young learners.
The examples in the SPIKE Essential set are fun, but admittedly a bit ‘toyish’. My plan is to start with these basics to get Char comfortable, and then gradually extend them into more practical, real-world projects with the Prime set. I hope this will offer her another fun way to problem-solving and coding activities.
It’s been a busy week, and while we haven’t found time to work on our game and app projects lately, Char and I couldn’t miss the chance to dive into a Halloween tradition together: pumpkin carving!
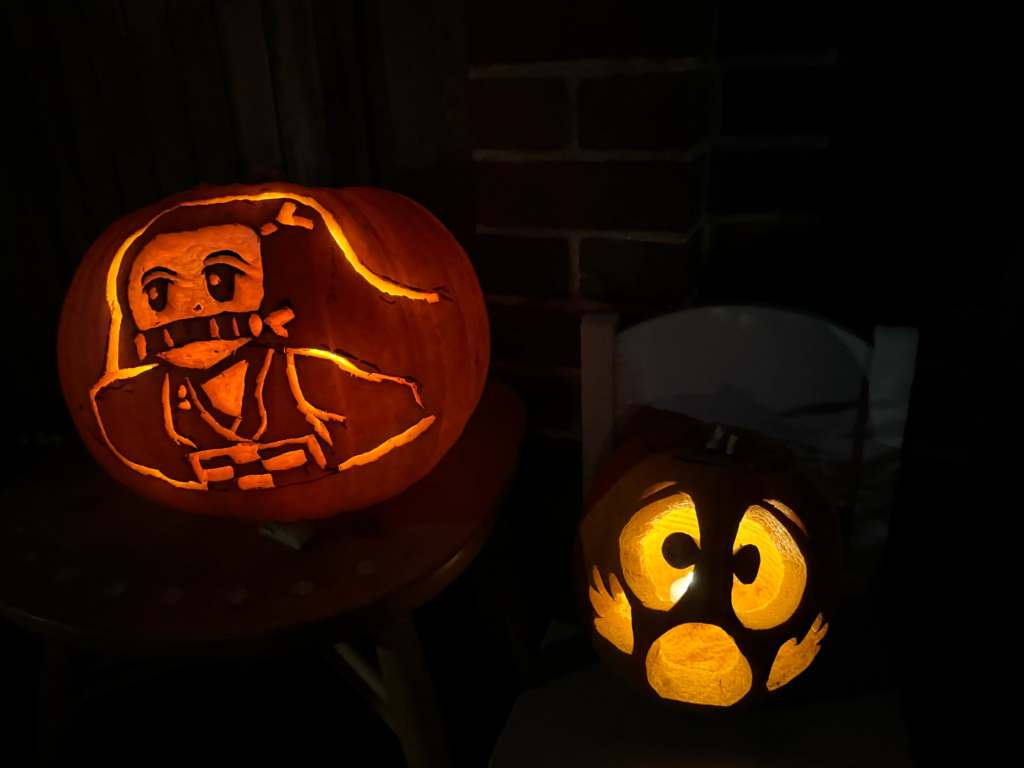
This Halloween, we went out with four pumpkins—two big and two small. As usual, I picked one to carve a character that’s been memorable from my year in anime. Last year, I carved Luffy from One Piece, and this year, I took on Nezuko from Demon Slayer. It turned out pretty well, although I did accidentally smudge her nose in the final cleanup.
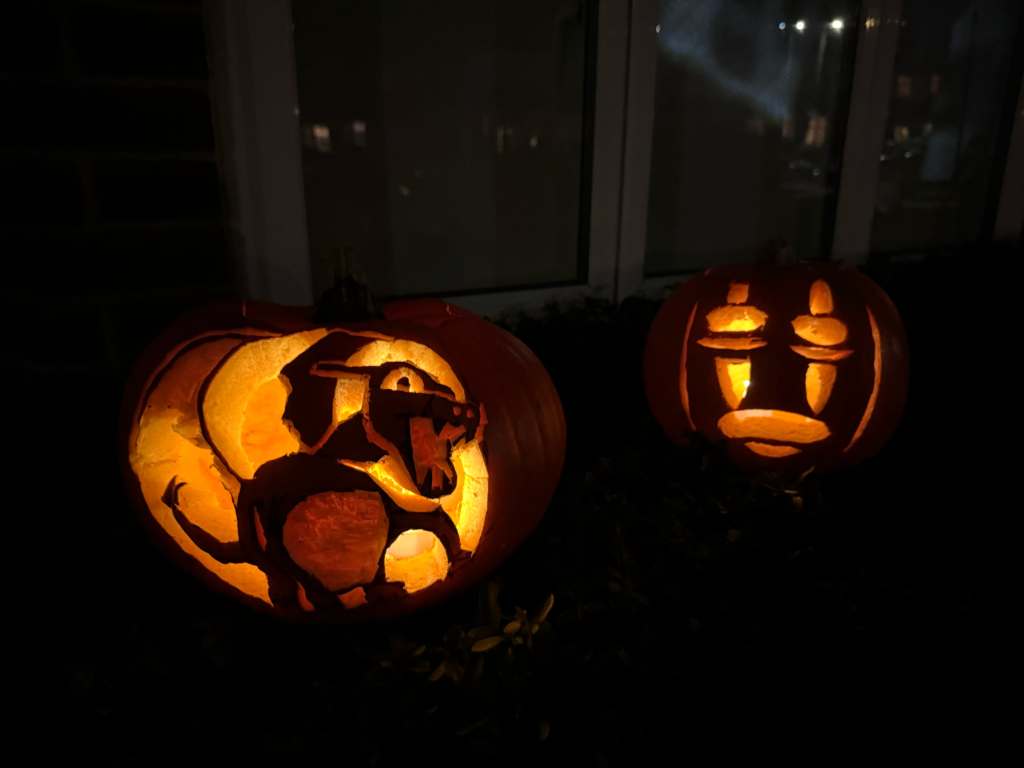
Char decided to continue her Pokemon theme. Last year, she carved Zubat, but this Halloween, she upped the challenge with Charizard! She found a pumpkin Charizard design online but we quickly realized it was a bit tricky to follow. To make it easier, she simplified and adapted it, also adding her own twist by turning Charizard’s flame tail into a star. It was amazing to see her custom design Charizard come to life as we carved it out together.
One of our smaller pumpkins was dedicated to an anime classic: the Faceless character from Spirited Away. I thought this would be a straightforward design because of its simple shape. However, when we transferred the design onto the pumpkin, the proportions didn’t translate perfectly; the face ended up looking more square than slim, giving Faceless a wired look. Although it wasn’t exactly what we intended, it still came out kind of spooky!
Last but not least, my wife joined in on the fun with her first-ever pumpkin carving. She went with a classic, spooky Halloween pumpkin face that turned out looking like a scream. It had just the right amount of shock and Halloween vibes, and I’d say she nailed it!
There’s something special about spending time together, trying out new ideas, and seeing them take shape—whether it’s an app, a game, or just some pumpkins.
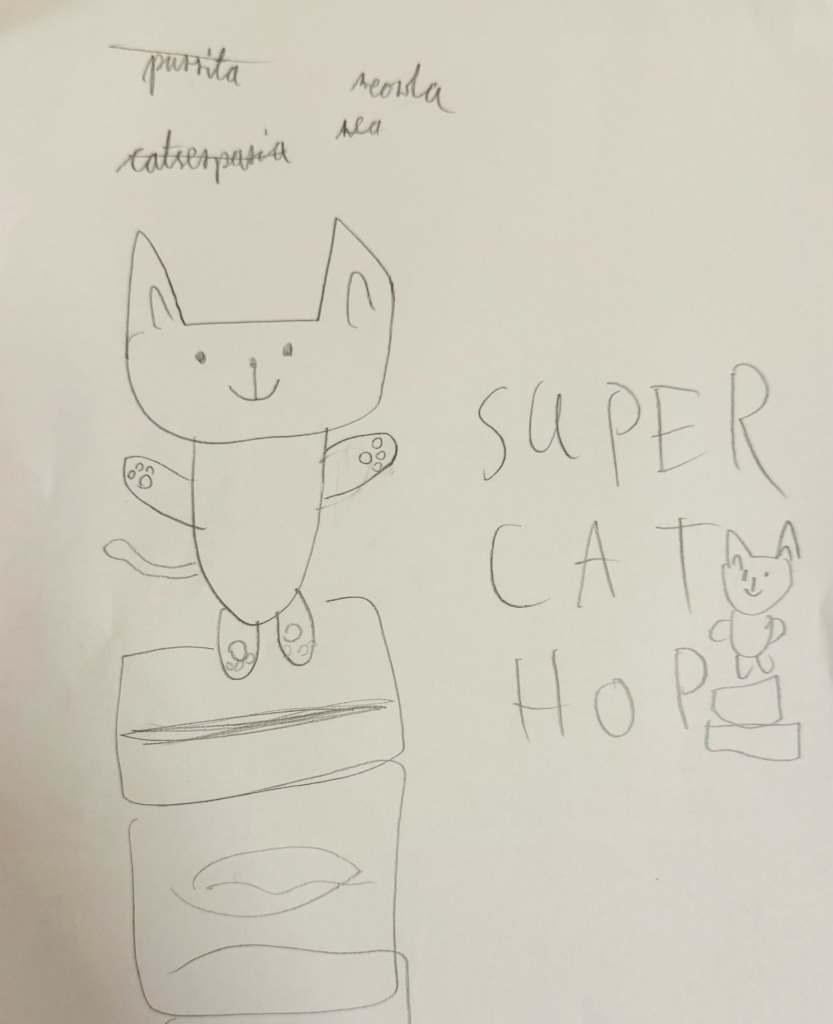
After nailing down the basic game logic for Super Cat Hop with SpriteKit, I hit an interesting challenge this week—turning Char’s “awesome” 😹 character drawings into fun, animated characters for the game! I quickly realized that, although I’m pretty good at coding, my drawing skills needed some serious work. So, I took some actions to dive into the world of 2D game art design.
The good news is that I didn’t need to become a master artist—just being able to create simple comic-style characters with bold edges and bright colors would do the trick. I started exploring some free tools and landed on two great options: Grease Pencil from Blender and Krita. While both were awesome, I went with Krita because it reminded me of the traditional drawing apps like Photoshop that I’m a bit more familiar with.
But before I switched to Krita, I gave Grease Pencil a try. I took my Char’s drawing, traced it, and added some colors. The Sculpting tool was cool—it let me move lines and points around to animate the character easily. The animations turned out pretty well, but something about it still felt a bit… off. It wasn’t the tool—it was me! I realized I needed to get better at drawing itself, not just using the tools.
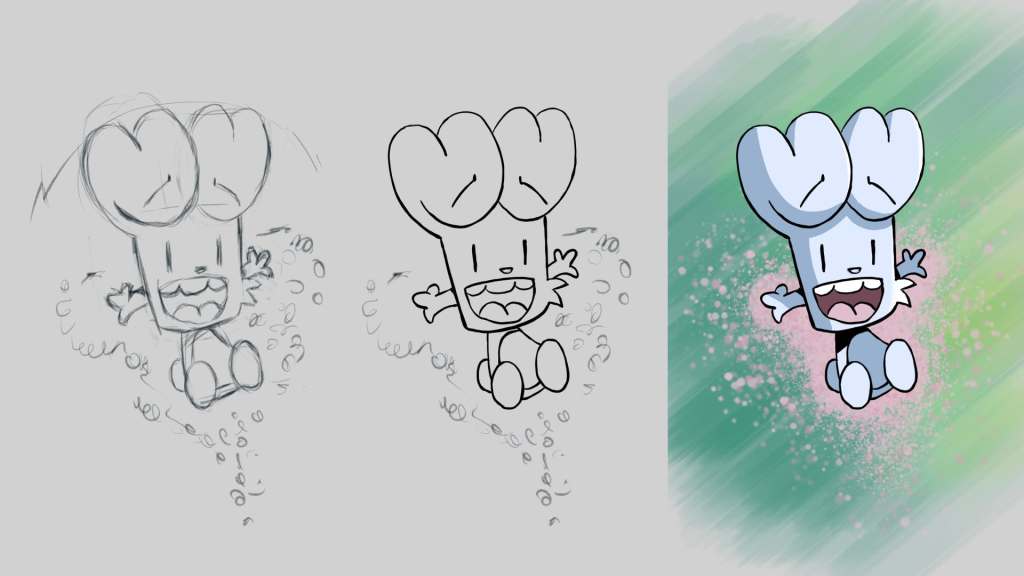
So, I switched gears and started an online drawing course for Krita. After five hours of sketching, outlining, coloring, and shading, I was feeling a lot more confident. For my first practice piece, I drew my Char’s favorite comic, Bunny vs. Monkey. And honestly? It’s one of the best things I’ve ever drawn! Not bad for a beginner!
Once I had some drawing skills under my belt, I went back to Super Cat Hop. I redid the background and simplified my Char’s character, taking inspiration from Bunny vs. Monkey. Instead of detailed hands and legs, we went with a simple triangle body for the character, and it works! I added the game logic from last week, and now we’ve got a basic version of the game where the character hops around.
Next up, Char and I will work on refining the background to make it more original, adding sound, and giving the game a fun title. We’ve decided that instead of aiming for perfection, we’ll wrap this project up soon so we can move on to more fun ideas. With each game we build, we’re learning and getting better—and most importantly, we’re having fun together!
This week, I stumbled across a great video on YouTube—it’s from an old WWDC17 session called “60 Seconds Prototyping“. I thought it would be fun to watch it with Char together, as we’re looking for new ideas to make our next app.
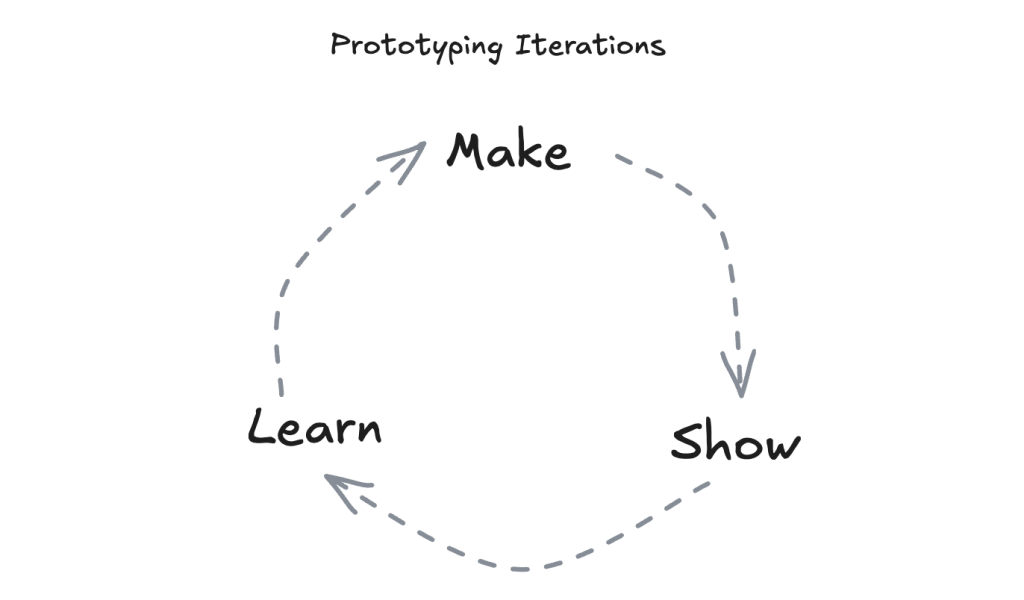
In the video, the presenter showed how you can use Keynote (MacOS version of the Powerpoint) to quickly create an app interface prototype in just one minute. The whole idea behind it was simple—don’t overthink it, just make something, show it to others, and learn from the feedback. I really like this idea, as this was such an easy concept for Char.
Usually, when we’re working on a new app or game idea, Char starts with a drawing on paper, then I jump into coding. But here’s the thing—it can take a while to get the prototype ready, and looking back, I think we could have saved some time by trying quick, simple prototypes at the start.
I hope watching this video helps Chan feel more confident. Sometimes she thinks, “I can’t code, so I can’t make the app,” but this video showed her that even with just paper and a pen, she can prototype! I’m hoping she takes that confidence and starts not only sketching her ideas but also sharing them with friends for feedback—maybe even changing things up before coming back to me for the coding phase.
As for our next project, I’m definitely going to encourage this idea of quick iterations. Instead of trying to perfect the design right from the start, we’ll aim to keep things simple, gather feedback, and improve as we go. 🏃♀️➡️
This weekend, I had hoped to work on a new color scheme for Quick Times Tables, but I only had a bit of time to make some updates. So, I focused on two small but important enhancements for version 1.2.
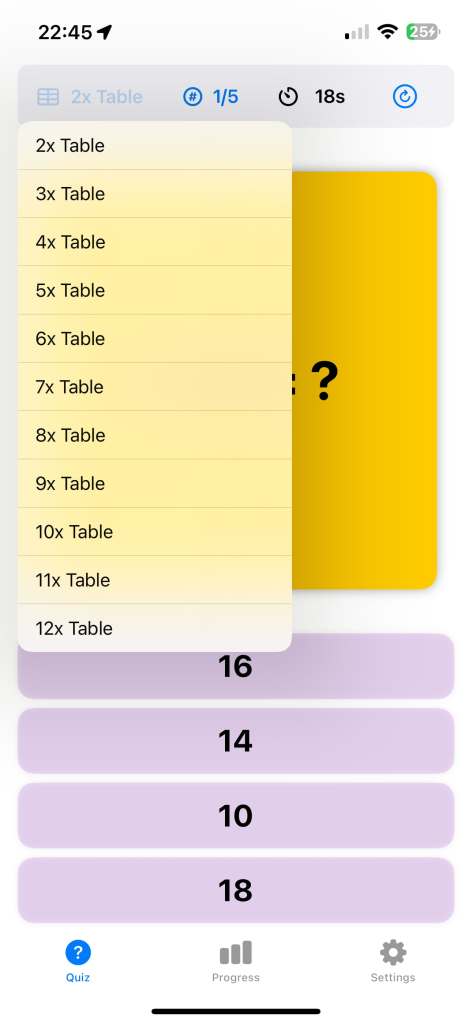
The first update allows you to change the times table and number of questions directly from the quiz page’s status bar. This improvement came from a suggestion made by my wife. It’s such an obvious feature in hindsight, but somehow I didn’t think of it when building the first version. Perhaps my daughter and I should recruit her as our official project manager!
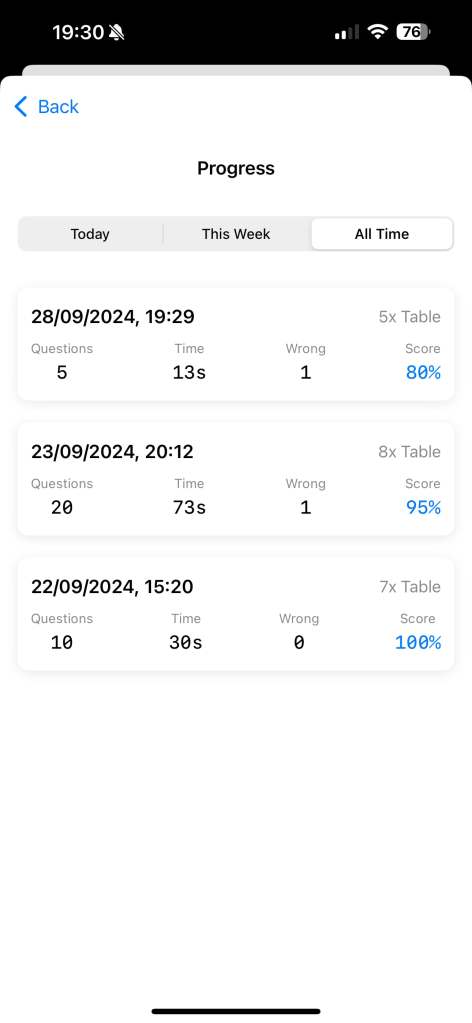
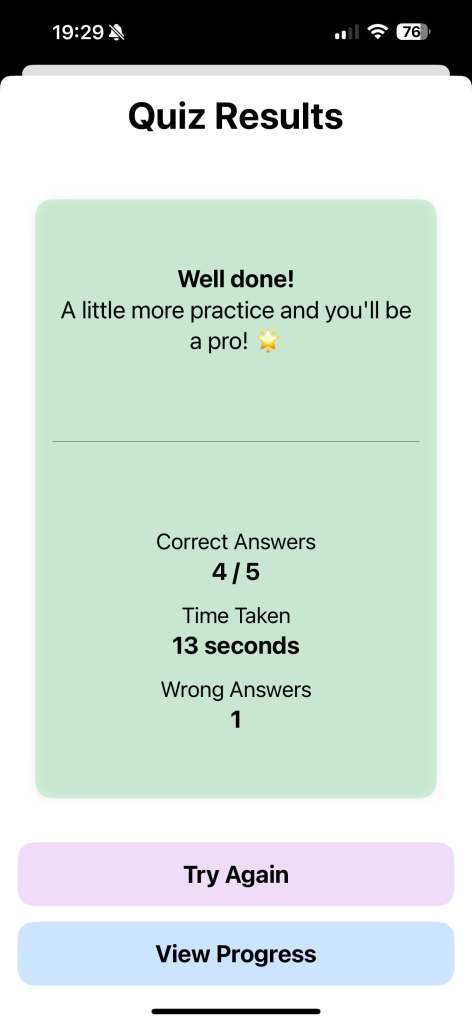
The second update is a new timer that shows the elapsed time in seconds during the quiz. Initially, I wasn’t sure if this feature was necessary, as I thought it might be distracting. But after thinking it over, I realized it could be very useful for children aiming to improve their speed. If you find it distracting, don’t worry—you can hide the timer in the settings if you prefer.
Hopefully, I’ll have more time next weekend to work on the color scheme. Maybe I’ll even add a fun “monster” theme, as my daughter suggested!
This week, Char and I officially began working on our new game, Super Cat Hop. My main task has been learning how to use SpriteKit, a native game development framework for iOS. Last year, we tried using Unity to build a simple game together, but the process of deploying it to the App Store was a big hassle 😮💨 . As some of Unity’s libraries track user data, which make the privacy policy very complicated. Therefore this time, I decided to go with iOS’s native game framework to avoid these issues.
Hey O1, make me a game!
Since SpriteKit is new to me, I thought I’d test the waters by exploring AI’s ability to generate a basic game prototype. I provided a very detailed prompt with the game’s logic, scoring system, and mechanics to OpenAI’s O1 model, but unfortunately, the result didn’t work as expected. The generated game had issues with jumping mechanics and block movement (I guess the game logic might still be a bit challenging for LLMs at the moment). So I went back to learning SpriteKit from scratch.
First SpriteKit Fun
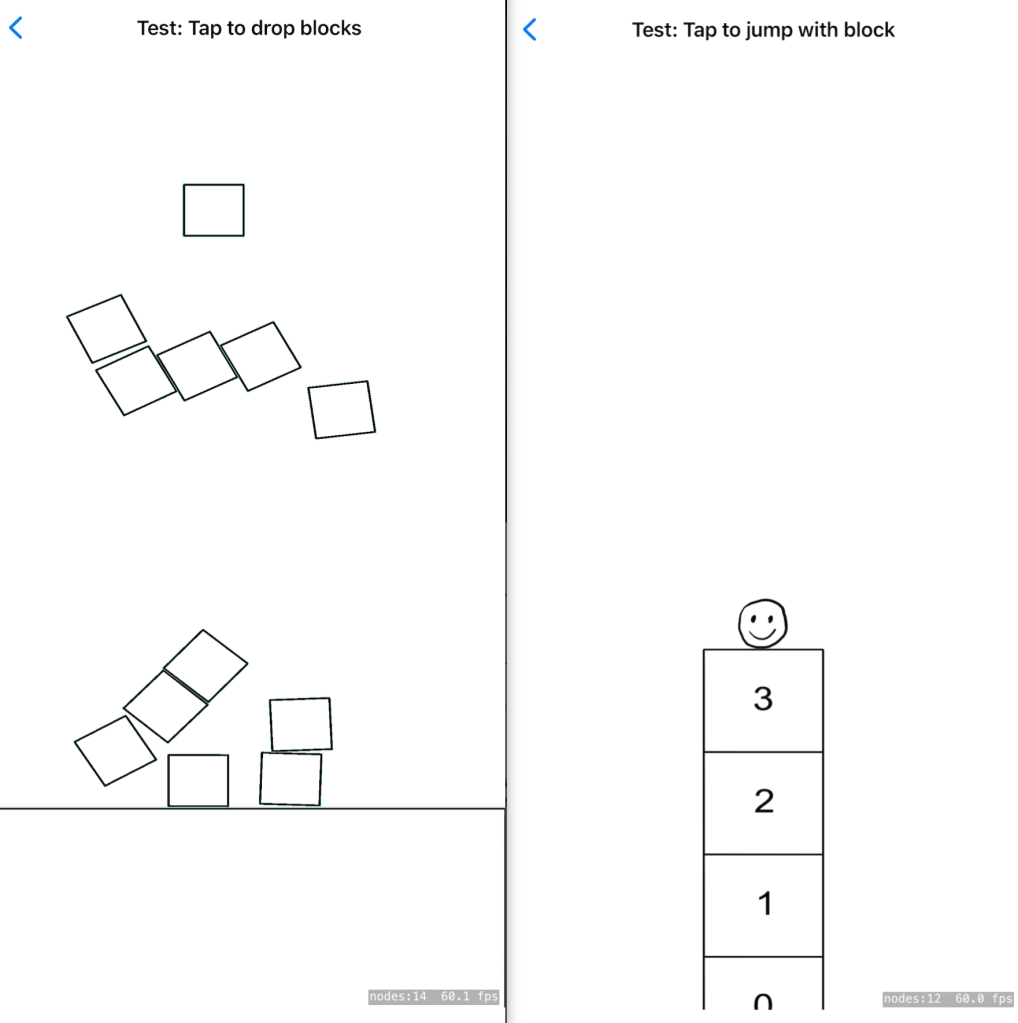
I started with the basics—drawing sprites and adding animations. The process felt pretty straightforward, and I was impressed with the physics system in SpriteKit, which allows you to create interactive elements quickly. I had a lot fun of play blocks with the physics system.
However, I think that for Super Cat Hop game, the physics system might be more complex than necessary. Instead, I’ll use traditional math-based rules to control the cat and blocks. Below is an example of my second attempt. I added a simple animation of a smiley face and implemented the core jumping logic. Each time the player taps the screen, the cat hops, and blocks appear on the screen.
The mechanics are coming together, but the hardest part will likely be the graphic design. I’m not very good at drawing, so my task for next week is to work on improving the visuals. Meanwhile, Char is focusing on designing the game’s characters and background. We’re aiming to have a prototype ready by next week, and I’m excited to see how it all comes together.
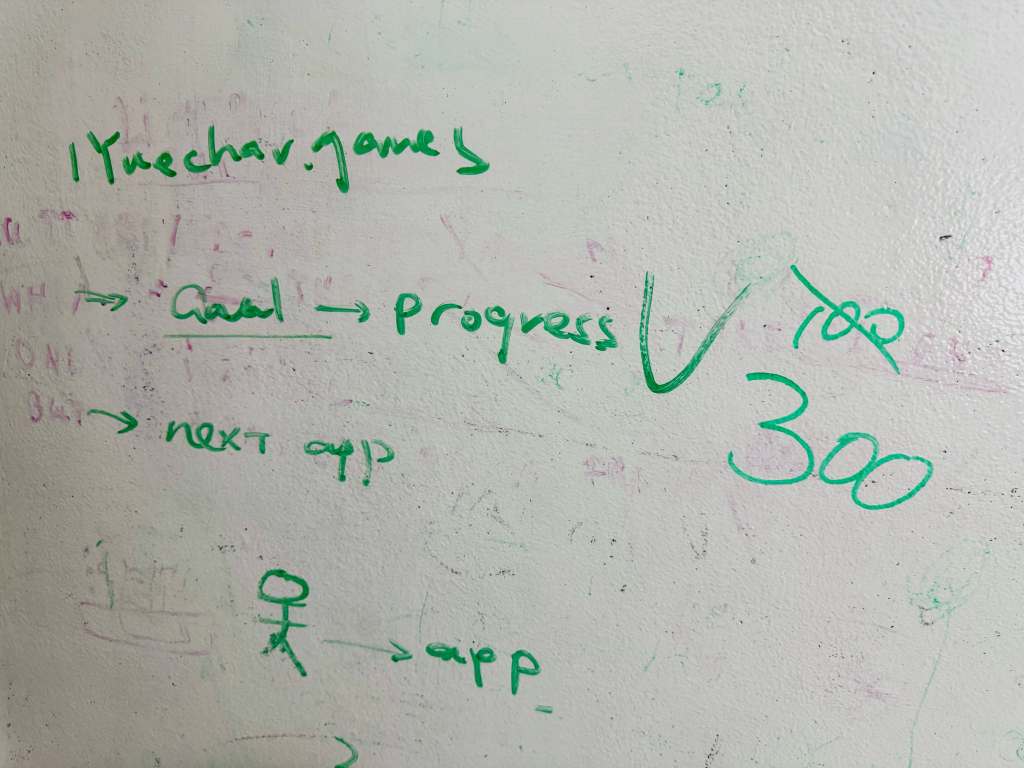
After releasing our second app, Letter Sequence Buddy, I thought it was a great time to have a ‘proper’ company meeting with Char to review our progress and plan for what’s next. So, we held our very first official stand-up meeting yesterday.
I asked Char to set a goal for how many users we’d like to have by the end of the year. At first, she said 100 downloads, but I encouraged her to think bigger. After taking a moment to reconsider, she proudly raised the goal to 300 users! I guess 300 is a pretty ambitious goal for her 😉.
Next, we talked about how we could reach that number. I suggested that we could either improve our current apps or build something new. No surprise, she was more excited about building new apps, so we moved on to discuss what we could create next.
I suggested that we should stick with the 11-plus exam theme since it’s relevant to her studies. We’ve already covered math and verbal reasoning, so I thought a non-verbal reasoning app focused on shape recognition would be a good next step. But Char found that idea is a bit boring. Instead, she proposed something much more exciting—a quiz game with a dragon that shoots fireballs when you tap the correct answer! 🐉🔥 I loved the idea, but I had to admit that my design skills aren’t quite up to creating dragons and fireballs. So, we decided to start with something simpler.
Super Cat Hopper
In the end, we landed on a game idea she came up with called Super Cat Hop. It’s a simple jumping game where a cat (called Meowla) jumps over blocks that come from either side of the screen. If the cat jumps in time, it lands on the block; if not, it gets hit, and the game is over. Although the concept is simple, it’s a great place to start, especially since game development is a lot harder than building basic apps.
We have agreed the next steps, I’m going to focus on learning how to make 2D games, while Char continues designing the game. Stay tuned—we’ll hopefully have a fun cat-jumping game to share soon!
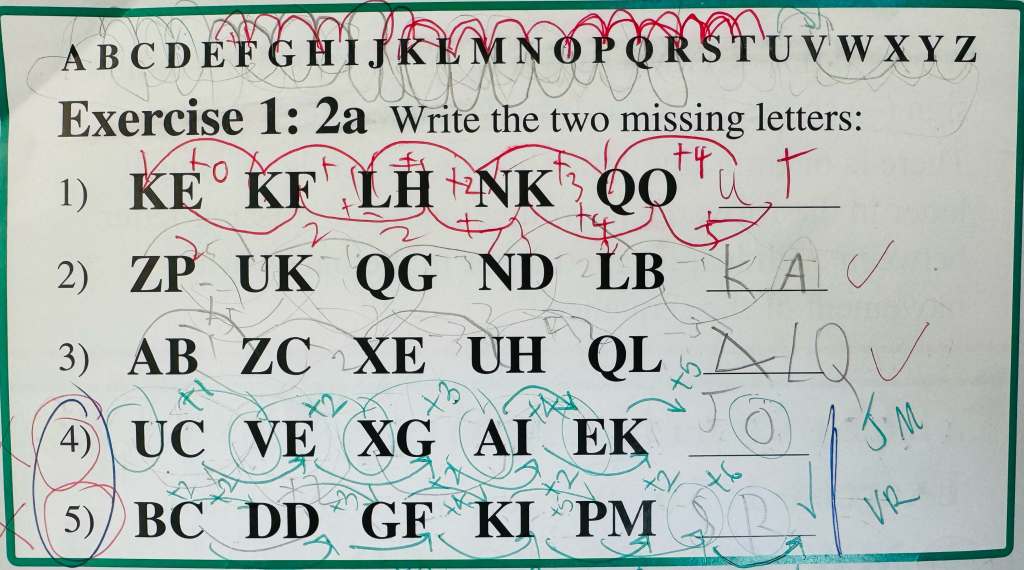
As my Char continues preparing for her 11-plus exam, one of the areas she’s focusing on is Verbal Reasoning, which includes tricky letter sequencing questions. These questions ask her to identify patterns in a sequence of letters, like figuring out what comes next in a series such as A, C, E (the answer is G, by the way 😉).
Although I don’t find these questions particularly hard, I noticed that Char takes a lot of time to solve them. Part of the challenge is that she often has to write down the entire alphabet and draw arcs to figure out the patterns. But as she works through several exercises, the repeated writing and drawing becomes messy, and the overlapping arcs can make it hard to see what’s going on. This can even lead to mistakes, even when she’s reasoning correctly.
That’s when we decided to build an app to help simplify this process. We call it Letter Sequence Buddy, and it’s designed to save time and make the analysis of letter sequences clearer.
Letter Sequence Buddy
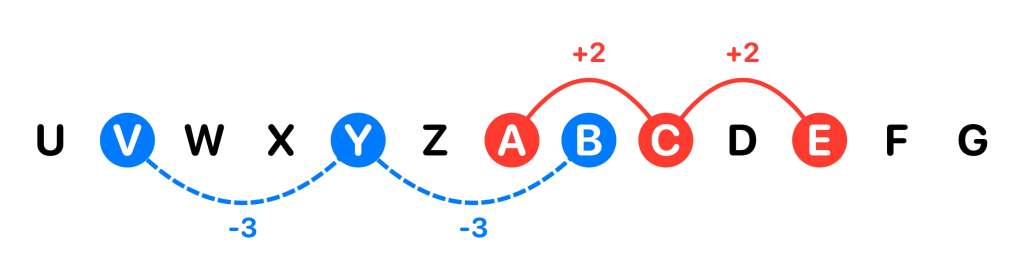
Letter Sequence Buddy is very straightforward. It displays a sequence of alphabet letters in order, right in the middle of the screen. You can scroll through the letters left or right, and to highlight a pattern, you just tap on a letter and then tap on the next letter. The app automatically draws an arc between the two letters and shows the distance between them, simulating how my daughter would manually draw arcs.
For more complex patterns, we’ve added a dual-color feature. You can switch between red and blue arcs, with red drawing arcs above the letter sequence and blue drawing them below. This makes it easier to separate overlapping patterns, like one sequence going forward and another going backward, so it’s clear which patterns belong together.
While it would have been easy to include an option that automatically provides the answers, I made a deliberate choice not to do that. I want this app to be a tool that saves time by helping children quickly visualize letter patterns, but I still want them to work out the reasoning on their own. It’s important that the app doesn’t take away the challenge but instead enhances the process of solving the problem.
We’ve just submitted Letter Sequence Buddy to the App Store, and I’m happy to see that Char is already using it and making good progress in her Verbal Reasoning exercises. If you or someone you know struggles with analysing letter sequences, this app could be a great tool to help save time while working through the reasoning process.
It’s been a week since we uploaded our first app, Quick Times Table, to the App Store. Initially, we didn’t expect any downloads at all since the app is so simple. But to our surprise, we saw around 50 downloads! This really motivated both Char and I, and we’re excited to keep improving the app. (hopefully those downloads aren’t all bots 🤖 !)
One of the main improvements we’ve been working on is progress tracking. To me, progress tracking is one of the best ways to motivate study. It’s satisfying to see your results and skills are improving over time; you can answer more questions faster. In the first version, we didn’t save any question results, but now we’ve added logic to store the results, so users can track their progress.
We’ve also made two smaller updates:
UI Improvement with Encouraging Messages: Previously, at the end of each exercise, the app only showed the results and score. Now, we display an encouraging message based on performance. If you do well, the app praises you for being a “brilliant star.” If you didn’t do so well, the app offers motivational words like “Keep practicing, you’ll get there!” Hopefully, this will encourage users to keep trying and improving.
Bug Fix: We discovered a bug while using the app ourselves—if the app was switched to the background, the timer continued counting. We’ve fixed this in the latest version so that the timer pauses when the app is in the background and resumes when it’s brought back.
The new version has already been reviewed and approved by the Apple App Store. Looking ahead, there are a few more features I want to add. First, I’m thinking of introducing a colour theme changer to liven up the UI, as the current colour scheme is starting to feel a bit dull. I’d also like to add a drill practice mode for wrong answers, which I believe will really help children improve their skills by focusing on the areas they need to work on.